
Planning your court layout
Building a bocce court is more than digging a rectangle. I’ve seen too many courts squeezed into tight corners where nobody can actually swing their arm. Before you grab a shovel, you need to map out the footprint to avoid a cramped, frustrating game.
Location is the first big consideration. You'll want a relatively flat area, ideally with some natural shade to avoid glaring sun during peak playing hours. Think about foot traffic – you don’t want people constantly walking through the court. Access to water is also handy for maintenance, and proximity to seating or a patio is a big plus.
Don't underestimate the space needed. A standard bocce court is longer than most people initially imagine. Consider the throwing area, the buffer zones, and the space needed for players to comfortably move around. I recommend laying out the proposed court dimensions with rope or spray paint to get a real feel for the size before you start any digging. It’s much easier to adjust the plan at this stage than to realize you’ve built a court that’s too small after all the work is done.
Finally, think about the long-term. A well-planned court will not only be enjoyable to play on but will also add value to your property. A poorly planned one? Well, that might just become an overgrown eyesore.
Official vs. casual dimensions
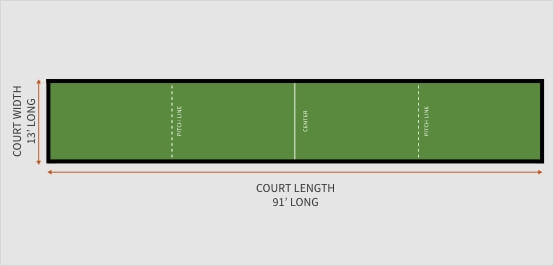
Let’s talk specifics. Official bocce ball courts, used for tournament play, adhere to strict dimensional guidelines. According to Templeton Tennis Ranch, a standard court is 91 feet long and 13 feet wide. However, for a backyard setup, you have a lot more flexibility. The key is to find a balance between authentic gameplay and what realistically fits your space.
The minimum length I'd recommend is 60 feet – anything shorter and the strategy really changes, becoming more about power than precision. A width of 8-10 feet is usually manageable for most backyards. Remember to add buffer zones on all sides. You’ll want at least 5 feet of space beyond the end lines for players to comfortably throw, and 2-3 feet on the sides.
Here's a breakdown of common dimensions:
A shorter court, say 60x8 feet, will lead to faster-paced games with less emphasis on strategic ball placement. Longer courts, closer to the official 91x13 feet, reward precision and tactical thinking. Consider your playing style and the skill level of your regular opponents when deciding on the size. If you're primarily playing with family and friends, a slightly smaller court is perfectly acceptable.
- Tournament standard: 91 feet by 13 feet
- Backyard Recommended (Minimum): 60 feet long x 8 feet wide
- Ideal Backyard: 70-80 feet long x 10-12 feet wide
- Buffer Zone (Ends): Minimum 5 feet beyond end lines
- Buffer Zone (Sides): Minimum 2-3 feet on each side
Bocce Court Dimensions & Gameplay Considerations
| Court Type | Length (feet) | Width (feet) | Recommended Buffer Zone (feet) | Gameplay Style |
|---|---|---|---|---|
| Tournament Standard | 91 | 13 | 5-10 | Strategic, longer rallies, precise throws |
| Recreational Standard | 80-90 | 10-13 | 5-10 | Balanced, accommodates various skill levels |
| Small Backyard (Compact) | 60-70 | 8-10 | 3-5 | Fast-paced, shorter throws, social play |
| Very Small Backyard (Minimal) | 40-60 | 6-8 | 2-3 | Casual, limited strategic options, beginner-friendly |
| Intermediate Recreational | 75 | 12 | 5-8 | Good balance of strategy and accessibility |
| Larger Recreational | 95 | 15 | 8-12 | Allows for more expansive gameplay and strategic depth |
Illustrative comparison based on the article research brief. Verify current pricing, limits, and product details in the official docs before relying on it.
Surface and base materials
The surface determines how the ball rolls and how much you'll sweat over maintenance. Crushed stone is cheap and drains well, but it stays rough and needs constant raking. Clay is the traditional choice for a smooth roll, but it's a headache to keep level and moist.
Decomposed granite (DG) is a good compromise. It’s relatively affordable, provides a smooth surface, and drains well. It’s also easier to maintain than clay. Many people also use oyster shell as a surface material. It's visually appealing and provides excellent drainage, but can be a bit more expensive and may require occasional replenishment.
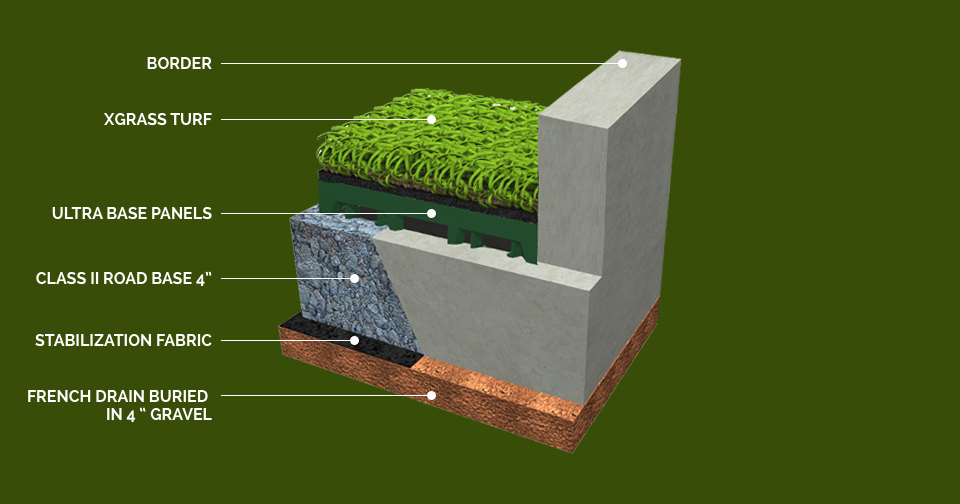
Underneath the surface layer, a good base is essential. I recommend a 4-6 inch layer of compacted gravel. This provides a stable foundation and helps with drainage. Don't skimp on this step – a poorly prepared base will lead to an uneven and unstable court. Proper drainage layers are vital; you don’t want a muddy mess after a rain shower.
Cost varies widely depending on the materials you choose. Crushed stone is the most affordable, while clay and oyster shell are the most expensive. Maintenance costs also vary. Clay requires the most frequent maintenance, while DG and crushed stone require less. Consider your budget and your willingness to put in the work when making your decision. A checklist of materials is below.
- Base Layer: 4-6 inches of compacted gravel
- Surface Layer: Crushed stone, clay, decomposed granite (DG), or oyster shell
- Edging: Wood, plastic, or stone
- Drainage: Drainage pipes (if needed)
- Tools: Shovels, rakes, tamper, level
Construction steps
Alright, let’s get building. This is where the real work begins. First, mark out the perimeter of your court, using stakes and string. Excavate the area to a depth of about 8-10 inches. This will allow for the gravel base and the surface layer. Ensure the bottom of the excavation is level – this is critical. Use a level and a long board to check for any unevenness.
Next, add the gravel base, spreading it evenly across the excavated area. Compact the gravel thoroughly using a tamper. This will create a solid foundation for your court. The more effort you put into this step, the better the final result will be. Proper compaction prevents settling and ensures a smooth playing surface.
Now it’s time for the surface layer. Spread your chosen material evenly over the compacted gravel. The depth of the surface layer will depend on the material – typically 2-4 inches for DG or crushed stone, and 3-6 inches for clay. Again, ensure the surface is level and smooth. Use a rake to remove any debris or imperfections.
Finally, add edging to define the court boundaries. Wood, plastic, or stone edging can be used. This will help to contain the surface material and prevent it from spreading. I’ve found that flexible plastic edging is the easiest to install, while stone edging provides a more permanent and aesthetically pleasing look. Regularly rake the surface to keep it smooth and playable. Compact the surface as needed to address any settling.
- Step 1: Mark out the court perimeter.
- Step 2: Excavate the area to a depth of 8-10 inches.
- Step 3: Add and compact a 4-6 inch gravel base.
- Step 4: Spread and level the surface material (2-6 inches deep).
- Step 5: Install edging to define the court boundaries.
Drainage: Avoiding a Muddy Mess
Water is the enemy of a good bocce ball court. Poor drainage will lead to a muddy, unplayable surface, and can even damage the base of your court. Proper drainage is absolutely essential. The key is to ensure that water flows away from the court.
The first step is to create a slight slope – about 1-2% – across the court. This will allow water to naturally drain off the surface. If your yard has poor drainage, you may need to install drainage pipes. These pipes should be buried beneath the gravel base and directed to a suitable drainage area.
Stick to gravel and decomposed granite if your yard holds water. I watched a friend build a clay court without a drainage plan; the first heavy rain turned it into a swamp that stayed soft for three weeks. If you insist on clay, you need a sub-surface pipe system.
Consider the surrounding landscape. Are there any areas where water tends to collect? If so, you may need to take extra steps to divert water away from your court. A well-drained court is a playable court.
Maintenance and Upkeep: Keeping It Playable
Your court is built, but the work isn’t over. Regular maintenance is key to keeping it in top condition. Raking the surface is the most important maintenance task. This will help to keep the surface smooth and level, and remove any debris. I recommend raking the court after each use, or at least once a week.
Weeding is also important. Remove any weeds that sprout up around the edges of the court. These can interfere with gameplay and detract from the appearance of your court. Occasionally, you may need to replenish the surface material, especially if you’re using a material that tends to settle or erode.
Protecting your court from the elements can also help to extend its lifespan. Consider covering the court during periods of heavy rain or snow. This will prevent water from saturating the surface and causing damage. A little effort goes a long way in maintaining a playable and enjoyable bocce ball court.
Here are a few frequently asked questions about maintenance:
- Q: How often should I rake the court? A: After each use, or at least once a week.
- Pull weeds by hand or use a standard herbicide around the perimeter.
- Q: How often should I replenish the surface material? A: As needed, typically once or twice a year.
Lighting and accessories
Let’s take your bocce experience to the next level with some accessories. Lighting is a great addition if you plan to play at night. String lights or spotlights can create a festive atmosphere and extend your playing hours. Comfortable seating is also essential – a bench or a few chairs will provide a place for players to rest between rounds.
A scoreboard is a fun way to keep track of the score. You can purchase a dedicated bocce ball scoreboard, or simply use a whiteboard or chalkboard. I also recommend a good set of bocce balls – quality balls will roll smoother and last longer. A measuring tape is also handy for resolving disputes about which ball is closest to the pallino.
Here are a few ideas:
Investing in a few accessories can significantly enhance your bocce ball experience. Don’t underestimate the power of comfort, convenience, and a little bit of fun.
- Lighting: String lights, spotlights
- Seating: Bench, chairs
- Scoreboard: Dedicated bocce ball scoreboard, whiteboard, chalkboard
- Bocce Balls: Quality sets
- Measuring Tape: For resolving disputes
Court Accessories
- Solar Lighting - Illuminate evening games with low-voltage solar path lights; options from brands like Ring or Mr. Beams provide easy installation.
- Electric Lighting - For brighter, more consistent illumination, consider string lights or spotlights from brands like Hampton Bay or RAB Lighting.
- Benches - Provide comfortable seating for players and spectators. Look for weather-resistant options in wood, metal, or recycled plastic from brands like POLYWOOD.
- Folding Chairs - A flexible seating solution, particularly useful for smaller spaces. Brands like Lifetime offer durable, portable options.
- Manual Scoreboard - A classic way to track points. Dry-erase boards from brands like U.S. Plastic Corp. are easily customizable.
- Measuring Tape - Essential for accurate pallino and bocce ball placement. Look for tapes from brands like Stanley or Lufkin, at least 25 feet in length.
- Court Markers - Define court boundaries clearly with flexible boundary markers or landscape edging from brands like VEVOR or Gardzen.
- Ball Carriers - Conveniently transport and store bocce ball sets. Many sets from brands like GoSports include a carrying case.


No comments yet. Be the first to share your thoughts!